How to Install Rear View Camera: A Complete Guide

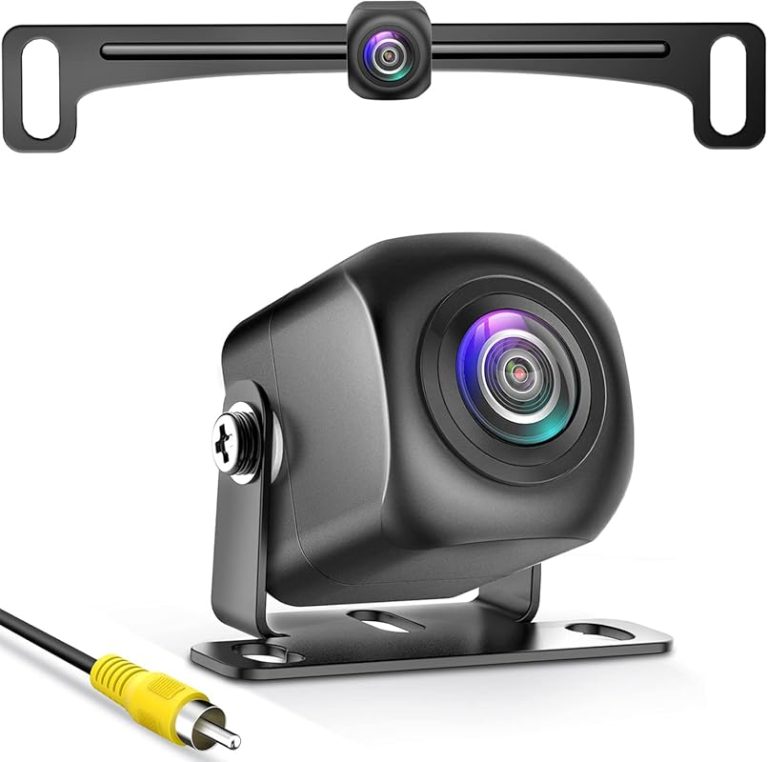
Adding a rear-view camera can make reversing and parking easier. You can install one by mounting the camera near the license plate, routing its cable to the display, and connecting power to the reverse-light circuit.
I’ll cover camera types, system compatibility, required tools, safe wiring, display connections, testing, and common fixes. You’ll also learn how to adjust the camera angle for a clear view.
Key Takeaways
- Choose a camera that matches your vehicle and display.
- Route and secure wires away from heat and moving parts.
- Test the image, power, and camera angle before finishing.
Camera Types And System Compatibility
I match the camera, video connection, display, and power supply before I begin installation. The vehicle’s head unit must accept the camera’s video signal, while the power circuit must provide the correct voltage and switch on reliably during reverse.
Wired And Wireless Options
I usually choose a wired camera when reliability matters most. It sends video through a cable from the rear of the vehicle to the dashboard display. This setup takes more work because I must route the cable under trim panels, but it avoids wireless signal interference and usually provides a more stable image.
A wireless camera sends video to a receiver near the display. It reduces cable routing, but nearby electronics, metal body panels, and poor receiver placement can cause interference or delays. I check whether the kit uses a dedicated transmitter and receiver; a wireless camera will not connect directly to every factory screen.
I also confirm the connector type. Many aftermarket cameras use RCA video plugs, while factory systems may require a vehicle-specific adapter or interface. I never cut factory wiring until I confirm the pinout.
Display And Power Requirements
I first confirm that the display accepts the camera’s video format. An aftermarket monitor often uses a standard composite video input, while an original factory screen may need a compatible interface module. Some systems support only specific camera resolutions or signal types, so I check the manual before buying parts.
Most cameras use 12-volt vehicle power, but I verify the required voltage and current rating. I commonly connect the camera’s positive wire to the reverse-light power wire so it activates when I select reverse. I connect the ground wire to clean, bare metal or the correct grounding point.
The display also needs a reverse-trigger signal. This signal tells it to switch to the camera view. I test the system with the parking brake engaged and the transmission safely secured before I reinstall trim panels.
Tools, Parts, And Safety Preparation
I gather the correct camera, display, wiring, and tools before removing any trim. I also disconnect power and plan the cable route to prevent damage, loose wires, and electrical faults.
Essential Installation Tools
I prepare these tools and parts:
- Rear-view camera designed for my vehicle
- Compatible monitor or factory-display interface
- Video cable and power wires
- Wire strippers, crimpers, and butt connectors
- Trim-removal tools and screwdrivers
- Drill and correctly sized drill bit, if needed
- Electrical tape, cable ties, and split loom
- Multimeter or test light
- Fuse tap and the correct fuse, if required
I check the camera manual before connecting wires. Most systems use a power wire, ground wire, video cable, and reverse-trigger wire. I use sealed connectors or heat-shrink tubing near the liftgate, trunk, or rear bumper because moisture can corrode exposed connections.
I test cable length before mounting the camera. I leave enough slack at moving panels, but I secure the cable away from hinges, sharp metal, exhaust parts, airbags, and hot engine components.
Vehicle Safety Precautions
I park on level ground, switch off the ignition, apply the parking brake, and remove the keys. Before handling vehicle wiring, I disconnect the negative battery cable and wait several minutes. This reduces the risk of a short circuit and helps prevent accidental airbag deployment.
I inspect the vehicle manual to identify airbag wiring, fuse locations, and trim-panel fasteners. I never probe yellow airbag wires or connect the camera to an unknown circuit. I use a multimeter to confirm power and ground instead of relying only on wire color.
I protect painted surfaces with masking tape and wear eye protection when drilling. I check both sides of the mounting area before making a hole, then remove metal filings and seal the opening against water. I keep all wiring secured so it cannot interfere with pedals, steering parts, seat tracks, or the hatch mechanism.
Mounting The Camera
I choose a location that gives the lens a centered, level view and keeps the wiring protected. I also check the camera angle, clearance, and mounting surface before tightening any hardware.
Choosing The Best Placement
I usually mount the camera above or beside the rear license plate, near the vehicle’s centerline. This position helps show both sides of the area behind the vehicle and makes parking guide lines more useful. I avoid placing it behind a bumper lip, spoiler, trim piece, or handle that could block the view.
I clean the mounting surface and hold the camera in place temporarily. From the driver’s seat, I check that the image includes the ground close behind the vehicle without pointing too far downward. The camera should remain level from side to side. I also inspect the area behind the mounting point to make sure drilling will not damage wiring, trim, or body panels.
I keep the lens away from areas that collect mud or water. If the camera includes adjustable brackets, I leave enough room to change its angle after installation.
Securing The Camera Housing
I follow the camera maker’s mounting instructions because screw sizes and bracket designs differ. For a screw-mounted camera, I mark the holes, use the correct drill bit, and apply automotive sealant around each opening before inserting the screws. The sealant helps prevent water from entering the body panel.
I tighten the screws firmly but avoid overtightening them, which can crack the housing or strip the mounting holes. I route the camera cable through a protected opening, then fit a rubber grommet around the cable if it passes through bare metal. I secure the cable inside the vehicle with clips or cable ties, keeping it away from exhaust parts, hinges, sharp edges, and moving suspension components.
For an adhesive mount, I clean the surface with isopropyl alcohol and let it dry fully. I press the housing firmly against the surface for the time stated by the manufacturer.
Routing Wires And Connecting Power
I route the video cable along the vehicle’s interior trim and protect it from sharp edges, heat, and moving parts. I connect the camera’s power and ground wires securely, then use the reverse-light circuit to activate the camera when I select Reverse.
Running Cables Through The Vehicle
I first disconnect the negative battery cable if the vehicle manual recommends it. I run the camera’s RCA or video cable from the hatch or trunk to the dashboard, usually beneath the door-sill trim or along the headliner. I keep the cable away from airbags, seat-belt parts, pedals, hinges, and exhaust components.
I remove trim panels carefully with a plastic pry tool. I avoid forcing clips, and I leave enough slack near the tailgate or trunk hinge for normal movement. A rubber grommet protects the cable where it passes through metal. I seal any unused opening to keep out water.
Before replacing the panels, I test-fit the cable and check that it does not pinch. I secure loose sections with cable ties, leaving connectors accessible for service. I connect the video plug to the camera and the display, then cover exposed connections with heat-shrink tubing or weatherproof tape.
Connecting To The Reverse Light Circuit
I locate the positive wire for the reverse lamp using the vehicle wiring diagram or a multimeter. With the ignition on and the parking brake set, I select Reverse only when the vehicle remains secure. I confirm the wire shows battery voltage only while the reverse lights operate.
I connect the camera’s positive power wire to that reverse-light positive wire with a sealed crimp connector, soldered joint, or approved fuse tap. I connect the camera’s ground wire to clean, unpainted metal or the manufacturer’s specified ground point. I do not rely on loose screws or painted surfaces.
If the display needs a reverse trigger, I connect its trigger wire to the same reverse-light positive wire. I protect every splice from moisture and route it away from the exhaust and sharp brackets. After reconnecting the battery, I test the image, reverse lights, and cable movement before reinstalling all trim.
Connecting The Display And Testing
I connect the camera’s video cable to the correct input on the display, then power the system through the reverse-light circuit. I test the image while the vehicle remains parked, check the wiring for secure connections, and adjust the view before driving.
Linking To The Head Unit Or Monitor
I plug the camera’s RCA video cable into the head unit’s rear-camera input, not an auxiliary video port. If the display uses a dedicated connector, I use the adapter supplied with the camera or head unit. I connect the camera’s power wire to the positive reverse-light wire and attach its ground wire to clean, bare metal.
I also connect the camera’s trigger wire to the head unit’s reverse signal wire. This signal tells the display to switch to the camera view when I select reverse. Some systems use a wireless transmitter instead of a long video cable, but I still follow the manufacturer’s wiring instructions.
Before testing, I secure the cables away from hinges, sharp metal, hot parts, and moving panels. I leave enough slack near the trunk or hatch so the wires do not pull when it opens.
Checking Image Quality And Guidelines
I turn the ignition on, apply the parking brake, and select reverse without moving the vehicle. The screen should show a clear image within a few seconds. If it stays blank, I check the camera’s power, ground, video plug, and reverse trigger connection.
I adjust the camera so the view shows the area directly behind the vehicle, including part of the bumper. I confirm that the image is not upside down and that the left and right sides match the vehicle’s direction. If the display offers guideline settings, I disable them or calibrate them according to the manual.
I test the camera in daylight and low light. I clean the lens, inspect for flickering, and check that the image remains stable when I open and close the trunk or hatch.
Final Adjustments And Troubleshooting
I seal every exterior opening, secure the wiring, and confirm that the display shows a steady image. I also test the camera in reverse, check its angle, and verify that parking guides match the vehicle’s actual path.
Weatherproofing And Reassembly
I apply automotive-grade silicone sealant around the camera mount and any drilled hole. I keep sealant away from the lens, connector pins, and areas that must remain removable. If the camera includes a rubber gasket, I install it before adding a thin sealant bead.
I route wires through protective loom and secure them with cable ties. I leave enough slack near the hatch or trunk hinge for movement, but I keep the cable away from exhaust parts, sharp edges, and moving hardware. I replace trim panels carefully and confirm that clips, screws, and weather seals sit correctly.
After reassembly, I spray a small amount of water over the camera mount and nearby wiring. I do not use high-pressure spray. I then inspect the interior for moisture and correct any leak before regular use.
Resolving Common Video Problems
If the screen stays black, I check the camera’s ground, power connection, and video plug first. I confirm that the reverse trigger wire receives power when I select reverse. A loose connector or incorrect fuse connection often causes this problem.
For a flickering or distorted image, I inspect the video cable for pinches and tight bends. I separate it from high-current wires when possible and reseat each connector. Wireless systems may need a better transmitter connection or a different power source.
If the image looks upside down, mirrored, or poorly aligned, I adjust the camera settings or reposition the mount. I place the vehicle on level ground and align the view with its center. I treat guide lines as aids, not as a substitute for checking mirrors and the area around the vehicle.
Frequently asked questions
How long does installation take?
I usually need two to four hours for a wired camera. The time depends on the vehicle, camera location, trim panels, and whether the display already supports a video input.
Where should I connect the camera’s power wire?
I typically connect it to the positive wire for a reverse light, so the camera turns on when I select reverse. I confirm the wire with the vehicle’s wiring diagram or a multimeter before making the connection, then protect the circuit with an inline fuse if the kit requires one.
Do I need to drill into the car?
Some cameras fit near the license plate lights or use an existing opening. If I must drill, I check behind the panel first, use the correct bit, and seal the hole to prevent water damage.
Can I install a wireless camera?
Yes. I still need to connect power at the camera, and I must power the receiver near the display. Wireless systems can simplify video wiring, but interference or signal loss may affect the image.
Will the camera work with my factory screen?
I check whether the screen accepts a compatible video signal and whether the vehicle needs an adapter or activation. Some systems require a separate monitor instead.
How do I adjust the camera view?
I park on level ground, center the camera, and adjust its angle until I can see the area behind the vehicle. I treat the display as an aid and still check mirrors and surroundings before reversing.
Conclusion
I can install a rear-view camera with careful planning, basic tools, and the correct wiring diagram for my vehicle. I mount the camera securely, route the video cable away from moving or hot parts, and connect power to the reverse-light circuit as directed by the manufacturer.
Before I finish, I test the camera in reverse and check the image in both daylight and low light. I also confirm that the view covers the area behind the vehicle and that the guide lines appear correctly, if the system includes them.
- I secure all wires and replace removed trim panels.
- I protect connections from moisture.
- I keep the camera lens clean.
- I never rely on the camera alone when reversing.
If the display stays blank, shows a distorted image, or turns on at the wrong time, I recheck the ground, power, video connections, and reverse trigger wire. I disconnect the vehicle battery before changing wiring, and I seek professional help if the installation requires complex electrical work.