Dash Cam Hardwire Kit: How It Works and Installs

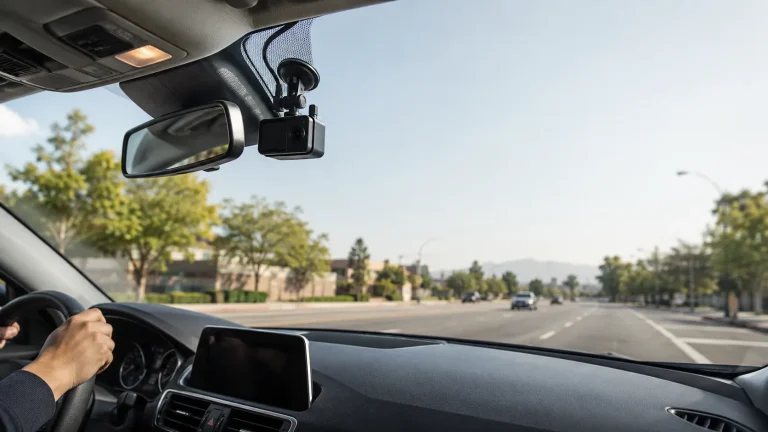
A dash cam hardwire kit connects a compatible camera to the vehicle’s electrical system, usually through the fuse box. It can hide the power cable, start recording with the ignition, and enable parking mode. Safe use depends on the correct kit, fuse type, power circuits, ground point, battery protection, and cable routing.
A hardwire kit is useful for drivers who want a clean installation or parking-mode recording. Owners gain an open 12-volt outlet and automatic camera power. The main limits are vehicle compatibility, battery drain, airbag-safe cable routing, and the risk of tapping the wrong fuse.
Plugging a dash cam into a 12-volt outlet is simple. However, the plug and loose cable can take up space. The camera may also lose parking-mode features when that outlet turns off.
Hardwiring solves some of those problems. It also adds electrical work that must be done with care. Before you install it, check both the dash cam manual and the vehicle owner’s manual.
What Does a Hardwire Kit Do?
A hardwire kit replaces the camera’s normal outlet cable. It connects the dash cam to a power circuit hidden behind the vehicle’s trim.
A basic kit may power the camera only when the ignition is on. A parking-mode kit may also use a constant-power circuit. That circuit remains live when the engine is off.
Many parking-mode kits use three connections:
- Constant power: Supplies power while the vehicle is parked.
- Accessory power: Signals whether the ignition is on or off.
- Ground: Completes the electrical connection through the vehicle body.
Wire colors are not the same across every brand. Follow the printed wire labels and the official manual. Do not rely on color alone.
Hardwire Kit vs Other Power Options
The best power method depends on whether you need parking mode, easy removal, or long parked recording.
| Power Method | Main Benefit | Main Limitation |
|---|---|---|
| 12-volt outlet | Easy plug-in setup | May not support parking mode |
| Hardwire kit | Clean, automatic power | Needs careful installation |
| OBD-II cable | Simple parking-mode option | Compatibility varies |
| Dash cam battery pack | Reduces starter-battery use | Adds equipment and cost |
Some brands require a certain cable for parking mode. Thinkware states that its regular 12-volt cable does not provide the accessory signal needed for that feature. Its dash cam power-option guide explains the differences among its supported cables.
- Keeps the 12-volt outlet available
- Hides most of the power cable
- Can enable supported parking mode
- Can start and stop automatically
- Requires access to vehicle wiring
- May drain a weak battery
- Wrong wiring can cause faults
- Moving it to another car takes work
Check Compatibility Before Buying
Start with the dash cam model. The camera plug must fit, and the kit must provide the voltage and control signals required by that camera.
Next, check the vehicle. Fuse shape, fuse-box location, electrical behavior, and trim design can vary by year, model, and trim.
Check: Confirm the camera model, power connector, supported input voltage, hardwire-kit model, vehicle voltage, fuse type, fuse-box location, parking-mode support, and battery-protection method. Limitations: Hybrid, electric, start-stop, luxury, leased, and warranty-covered vehicles may need model-specific instructions or professional installation.
Do not assume that every empty fuse slot can provide power. Some slots may be unused, switched, constantly powered, computer-controlled, or inactive on your trim.
Our car electronics guide covers other dash cam features worth checking before choosing a cable. These include parking recording, camera channels, app support, and storage needs.
How Battery Protection Works
Parking mode uses energy while the engine is off. A battery-protection feature attempts to stop the camera before the starter battery becomes too weak.
Protection may use one or both of these controls:
- Low-voltage cutoff: Stops power when battery voltage reaches a set level.
- Timer cutoff: Stops parking recording after a set period.
The available settings vary by camera and power cable. Do not treat one brand’s cutoff value as a universal setting.
Garmin says its compatible parking cable attempts to prevent the camera from draining the battery below starting level. It also notes that battery age and temperature can reduce the protection’s effectiveness. See Garmin’s vehicle-battery impact guidance.
Plan the Installation Safely
Park on a flat surface and switch the vehicle off. Keep the key or smart key away from the car if the manufacturer requires it during electrical work.
Find the fuse-box diagram in the vehicle manual. You also need the dash cam’s hardwire instructions. These two documents should guide every connection.
- Confirm the kit matches the exact camera
- Locate the correct vehicle fuse diagram
- Identify the vehicle’s fuse type
- Check for built-in battery protection
- Plan a route outside airbag paths
- Confirm warranty or lease restrictions
- Prepare a safe ground point
How to Install a Dash Cam Hardwire Kit
These steps explain the general process. They do not replace the instructions for your car and dash cam.
Place the camera where it does not block the driver’s view. Confirm the lens has a clear view before routing the cable.
Follow the headliner and trim toward the fuse box. Keep the wire clear of airbag deployment paths, hinges, seals, pedals, and seat tracks.
Use a multimeter or circuit tester as directed by the kit maker. Find the correct accessory and constant circuits if the kit needs both.
Match the fuse tap to the vehicle’s fuse shape. Follow the kit instructions for fuse position, rating, and tap orientation.
Attach the ground terminal only to a suitable metal ground point named or approved for the vehicle. A painted or loose point may not work.
Match each labeled kit wire to the tested circuit. Do not guess based only on wire color or fuse location.
Replace trim carefully. Make sure the wire cannot fall near the steering wheel, pedals, shifter, doors, or seat mechanisms.
Start the vehicle and check normal recording. Turn it off and confirm parking mode, timer behavior, and battery-protection settings while parked.
Moderate: The job requires trim routing, fuse identification, power testing, a secure ground, and careful work near airbags. Difficult fuse-box access or complex vehicle electronics may justify professional installation.
Common Hardwiring Mistakes
Most problems come from compatibility errors, incorrect circuits, poor grounding, or unsafe cable routing.
| Problem | Likely Cause | First Check |
|---|---|---|
| Camera never turns on | Wrong fuse or poor ground | Test power and ground |
| No parking mode | Accessory signal is wrong | Check labeled ACC wire |
| Camera stays in driving mode | Two constant circuits used | Retest the accessory fuse |
| Camera shuts off when parked | Constant circuit loses power | Retest with ignition off |
| Battery becomes weak | Cutoff missing or unsuitable | Review protection settings |
| Camera restarts while driving | Loose or unstable connection | Stop and inspect wiring |
Thinkware notes that a camera may fail to enter parking mode when the constant and accessory connections are reversed or connected to the wrong circuit. BlackVue also documents low-voltage and timer controls for supported hardwired cameras in its recording-mode manual.
- Test circuits before connecting wires
- Follow printed cable labels
- Use the correct fuse-tap shape
- Test parking mode while parked
- Guess which fuse is constant
- Tap a critical safety circuit
- Route wires across an airbag
- Ignore slow engine cranking
When to Use a Professional Installer
Professional installation is the safer choice when you cannot identify the correct circuits or airbag-safe cable path. It also makes sense when the fuse box is hard to reach.
Consider professional help for a leased vehicle, a complex luxury model, an electric vehicle, a hybrid, or a vehicle with sensitive electrical systems. Check the manufacturer’s rules before adding equipment.
Stop the project if you find damaged insulation, melted plastic, corrosion, loose factory wiring, heat, sparks, or a burning smell.
Our tools and garage gear section can help you review basic electrical and trim tools. The car care guide also covers battery and maintenance checks that may matter before using parking mode.
Maintaining a Hardwired Dash Cam
Check the installation after the first few drives. Make sure the camera remains secure and the cable has not moved out of the trim.
Review the battery-protection setting after a battery replacement, firmware update, dash cam reset, or electrical repair. A reset may return some settings to their defaults.
Is a Hardwire Kit Worth It?
A hardwire kit is worth considering when you want parking mode, automatic startup, hidden wiring, or a free 12-volt outlet. It works best when the camera and vehicle have clear installation guidance.
You may not need one if you only record while driving. A normal outlet cable may be simpler for a rental car, leased vehicle, or dash cam moved between cars.
- Best for: Owners who want clean wiring, automatic power, and compatible parking-mode recording.
- Think twice if: You cannot confirm the kit, fuse circuits, battery protection, or safe airbag routing.
- Next step: Match the kit to the exact camera, then check the vehicle manual and official installation guide.
Frequently Asked Questions
A dash cam hardwire kit connects a compatible camera to the vehicle’s electrical system instead of the 12-volt outlet. It can provide a cleaner cable route, automatic startup, and parking-mode power when the camera and kit support those features.
It can drain the battery if parking mode runs too long or battery protection fails. A compatible low-voltage cutoff or timer lowers the risk but cannot fix a weak battery, charging problem, extreme temperature, or another electrical drain.
No. Parking mode depends on the dash cam, cable, wiring method, and camera settings. Some kits provide only ignition-switched power. Others use constant power and an accessory signal so the camera knows when the vehicle is parked.
You may be able to install one if you can safely test circuits, identify fuses, route cables around airbags, and follow both manuals. Use a professional installer when the fuse box, trim, or electrical system is unclear.
Use only a suitable circuit allowed by the vehicle and kit instructions. The correct choice depends on whether the kit needs accessory power, constant power, or both. Avoid fuses linked to airbags, braking, steering, engine control, or other critical systems.
No. Connector type, voltage conversion, wire layout, fuse taps, parking-mode control, and battery protection can differ. Confirm compatibility with the exact dash cam model and vehicle before buying or connecting the kit.
Warranty effects depend on the vehicle, installation, and cause of any later problem. Check the vehicle warranty terms and ask the manufacturer or dealer before modifying wiring, especially on leased, new, hybrid, electric, or luxury vehicles.
Conclusion
A dash cam hardwire kit can provide clean wiring, automatic power, and parking-mode support. For owners, the main value is convenience and an open 12-volt outlet. For drivers, secure wiring can reduce clutter and distraction.
The main limits are compatibility, battery use, fuse selection, and safe routing near airbags. Confirm the exact kit, follow both manuals, test battery protection, and use a professional installer when any circuit or cable path is unclear.