How to Install a Dual Camera System in a Car: Step-by-Step Guide

A dual camera system gives you a clear view ahead and behind your car. You can install one yourself by checking compatibility, planning both camera positions, routing cables safely, and connecting power and reverse-signal wires correctly.
Mount the cameras securely, keep wiring away from airbags and moving parts, and test the image, recording, and reverse view before driving. I’ll explain the tools, cable routes, electrical connections, calibration steps, and maintenance checks that help you complete a clean installation.
Key Takeaways
- Check system and vehicle compatibility before installation.
- Plan camera placement and cable routes carefully.
- Test every view, connection, and recording function.
System Components And Vehicle Compatibility
I first match the cameras, display, storage, and wiring kit to the vehicle. The right combination depends on the desired viewing areas, available mounting locations, screen setup, and whether the car supports switched or constant power.
Camera Types And Coverage Areas
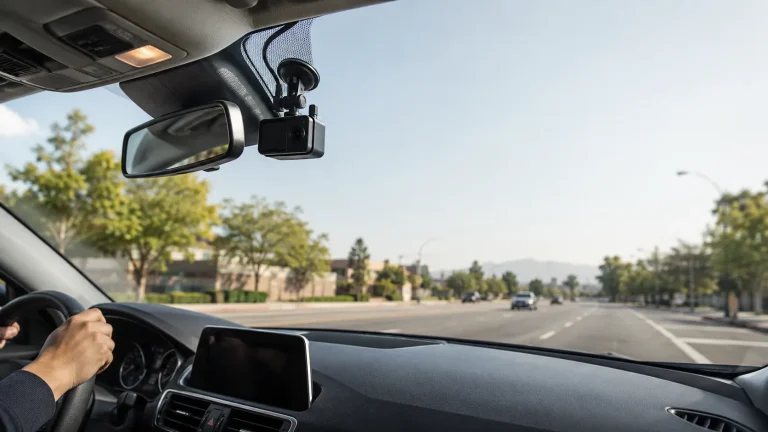
A dual camera system usually includes a front camera and a rear camera. I mount the front unit near the center of the windshield, behind the rearview mirror, so it records the road without blocking the driver’s view. The rear unit normally sits at the top center of the rear windshield and points through the glass.
Some kits use a cabin camera instead of a rear camera. I choose a cabin camera when I need to record passengers or the interior. A rear-facing camera provides better coverage behind the car, while a cabin camera may support rideshare or personal security needs.
I check the vehicle before mounting either camera. Tinted glass, rear window heating lines, windshield-mounted sensors, wipers, and hatch movement can affect the image or cable path. I also confirm that the camera’s viewing angle covers the needed area without recording too much dashboard or sky.
Display And Recording Options
I can use a system with a built-in screen, a separate monitor, or no permanent display. A built-in screen lets me aim both cameras and review clips inside the car. A screenless system usually connects to a phone through Wi-Fi or uses a computer for video review.
Most dual systems record both views to one memory card. I use a high-endurance microSD card that matches the camera maker’s capacity and speed requirements. Loop recording replaces older files when the card fills, while event protection saves clips after a collision or manual button press.
I also check whether the system records both cameras at the same time, includes audio, and supports parking mode. Parking mode may require a hardwire kit and can drain the battery if the vehicle lacks a low-voltage cutoff.
Power And Wiring Requirements
I identify the power method before installation. A 12-volt adapter offers the simplest setup, while a hardwire kit creates a cleaner installation and enables parking mode. Some vehicles need an add-a-fuse adapter that matches the fuse box type.
The front camera usually receives power near the windshield. I route the rear-camera cable beneath the headliner, down a side trim panel, and toward the rear hatch or trunk. I keep the cable away from airbags, hinges, pedals, and sharp metal edges. I leave enough slack where the hatch opens.
I verify the vehicle’s voltage and fuse layout before connecting anything. I connect constant power, switched power, and ground only as the kit instructions specify. After installation, I test ignition startup, shutdown, rear-camera operation, recording, and parking mode.
Planning Camera Placement And Cable Routes
I plan each camera’s view and cable path before removing trim or attaching mounts. I check visibility, sun glare, access to power, and safe wire routes so the system records clearly without affecting vehicle controls.
Choosing Front And Rear Mounting Positions
I mount the front camera high on the windshield, usually behind or beside the rearview mirror. This position keeps it within the wiper’s cleaned area and limits obstruction to my view. I center the lens as much as possible and leave space for the power cable.
I place the rear camera near the top center of the rear glass when the design allows it. I check that the lens has a clear view through the glass and does not point at a large section of the car’s interior. For an exterior rear camera, I choose a protected position above the license plate or near the rear hatch, following the manufacturer’s sealing instructions.
Before fixing either mount, I power the cameras and check the live image. I adjust the angle so the road fills most of the frame while the horizon remains close to the middle.
Mapping Interior And Exterior Cable Paths
I first identify the camera connectors, power source, and any required extension cables. For a typical front-and-rear system, I route the rear camera cable from the front camera area along the headliner, down the passenger-side trim, and toward the rear glass or hatch.
I keep the cable behind trim where possible and leave enough slack at hinges and removable panels. At the rear hatch, I guide the cable through the factory rubber wiring boot instead of pinching it between metal panels. An exterior camera may need a sealed pass-through and should not rely on an open gap.
I use trim clips or suitable adhesive mounts to prevent rattling. I avoid tight bends, sharp edges, and locations where trim could crush the cable. I also test the hatch, doors, and seats before replacing every panel.
Avoiding Airbags And Moving Components
I keep wiring away from the driver and passenger airbag paths. In particular, I do not place cable directly across an A-pillar airbag or bundle it in front of the airbag cover. I route the wire behind the airbag or along the opposite side of the mounting structure, following the vehicle service guidance when available.
I avoid steering columns, pedals, seat rails, window mechanisms, wiper linkages, and door hinges. These parts can cut, pull, or trap the cable during normal use. I secure loose sections so they cannot fall near the pedals or interfere with visibility.
I disconnect power before removing sensitive trim and use plastic trim tools to limit damage. After installation, I test the camera, power connection, doors, seats, windows, and hatch while checking that no cable shifts or catches.
Preparing Tools And Electrical Connections
I prepare the tools, power taps, and connection points before mounting either camera. I choose a safe fuse location, protect every joint, and keep wiring clear of airbags, sharp edges, heat, and moving parts.
Essential Installation Tools
I use plastic trim tools to lift panels without scratching them or breaking clips. A small screwdriver set, needle-nose pliers, wire cutters, wire strippers, and a crimping tool help me prepare and secure the wiring.
I also keep a digital multimeter nearby. I use it to identify a constant-power fuse, an ignition-switched fuse, and a reliable ground point. I switch the vehicle off before testing, then confirm the circuit behavior with the ignition on.
For cable routing, I use cloth harness tape, cable ties, and a flashlight. I avoid forcing the cable into trim gaps. Before I remove an A-pillar panel, I check the vehicle manual because some panels conceal curtain airbags.
Selecting Fuses And Add-A-Circuit Adapters
I select a fuse circuit that matches the camera system’s power needs and does not control safety equipment. I avoid circuits for airbags, brakes, steering, engine control, and other critical systems.
An add-a-circuit adapter lets me power the camera while keeping the original fuse protected. I match the adapter to the vehicle’s fuse style, such as mini, low-profile mini, micro2, or standard blade. I place the original fuse in the adapter’s protected slot and install the correct new fuse for the camera.
I connect the hardwire kit’s accessory wire to an ignition-switched fuse. If the kit supports parking mode, I connect its constant-power wire to a suitable battery circuit and attach the ground wire to clean, unpainted metal.
Protecting Connections From Moisture And Vibration
I make firm connections with properly sized crimp terminals or solder and heat-shrink tubing. I do not rely on twisted wires, loose tape, or exposed wire strands. After crimping, I pull each wire gently to check that it holds.
I route cables away from pedals, hinges, seat tracks, sharp brackets, and hot components. I secure loose sections with cloth harness tape or cable ties, but I leave enough slack near camera connectors to prevent strain.
I use adhesive-lined heat-shrink tubing on exposed joints when space allows. I keep connectors inside the cabin whenever possible and avoid placing them where water can collect. After connecting the system, I test recording and power behavior before reinstalling the trim.
Mounting Cameras And Running Wiring
I mount each camera where it has a clear view without blocking the driver’s sightline. I also keep cables away from airbags, moving trim, pedals, and sharp edges.
Securing The Front Camera
I place the front camera high on the windshield, usually behind or beside the rearview mirror. This position keeps it discreet and gives the lens a level view of the road. I check that the windshield wipers clear the area before fixing the mount.
I clean the glass with an alcohol wipe and let it dry. For an adhesive mount, I press it firmly against the glass for the time listed by the manufacturer. A suction mount should sit on clean, smooth glass and lock securely.
I start the camera and check the live image before hiding the cable. The horizon should look level, and the camera should capture the lane ahead without showing too much dashboard. I avoid placing it inside a tinted strip if that reduces image quality or weakens the mount.
Positioning The Rear Camera
I mount the rear camera near the top center of the rear windshield when the design allows it. This position gives a balanced view behind the car and keeps the camera away from luggage or passengers.
I check the rear defroster lines, wiper coverage, and window tint before attaching the mount. I avoid covering the camera lens with a defroster line or placing it where the hatch, trunk, or sunshade can strike it.
For a hatchback or SUV, I leave enough cable near the hinge for the hatch to open fully. I protect this section with flexible split loom or a rubber wiring sleeve. After connecting the camera, I check its image and adjust the angle so the road, not only the sky or rear bumper, fills the frame.
Routing Cables Through The Cabin
I route the rear-camera cable from the front camera along the headliner, keeping it tucked behind the roof trim. I use a plastic trim tool rather than a screwdriver to avoid damaging panels, seals, or the cable.
I keep the cable on the side away from curtain airbags when possible. If it must pass near an airbag, I follow the vehicle service information and never place the cable across the airbag’s deployment path. I also keep wiring clear of pedals, steering parts, seat tracks, and door hinges.
I run the cable down the appropriate pillar, under door seals, and toward the rear camera. I leave a small service loop at both cameras, but I avoid tight bends. I secure loose sections with fabric automotive tape or trim clips, then test the cameras before reinstalling every panel.
Connecting Power, Display, And Reverse Signal
I connect both cameras to fused power, route video cables away from interference, and test each connection before replacing trim. I also verify the reverse signal with a meter because wire colors and radio connections vary by vehicle.
Hardwiring The System Safely
I disconnect the negative battery terminal before making permanent connections. I mount each camera securely, then run its power and video cables through protected openings. I keep wiring away from exhaust parts, sharp metal, pedals, hinges, and airbag paths.
For a typical dual-camera system, I connect each camera’s red power wire to the required switched or reverse-powered source and each black wire to a clean chassis ground. I use crimp connectors or solder with heat-shrink tubing, not loose twists. I add an inline fuse close to the power source and match its rating to the manufacturer’s instructions.
I label the front and rear camera cables before routing them. I leave enough slack at moving panels, seal exterior pass-through points, and secure the harness with clips or ties.
Linking The Monitor Or Head Unit
I connect the video cables to the monitor or head unit using the labeled camera inputs. The rear camera usually connects to the rear-camera input, while the front camera connects to a second camera input or an auxiliary video input. I avoid forcing plugs and check that each connector locks fully.
I power the monitor from an accessory circuit that turns off with the ignition, unless the system requires a different source. I connect its ground to clean metal or the specified ground point. If the display uses a separate trigger input, I connect that wire according to the unit’s wiring diagram.
I route video cables along the vehicle’s interior trim and keep them separate from high-current wires when practical. After reconnecting the battery, I select each camera input and check for a stable picture, correct image orientation, and clear night lighting.
Integrating The Reverse Trigger Wire
I locate the vehicle’s reverse-light positive wire with a wiring diagram or a multimeter. With the parking brake set, I turn the ignition on, select reverse, and confirm that the wire shows battery voltage only while reverse is engaged. I do not rely on color alone.
I connect the monitor’s reverse trigger wire to this tested signal. If the dual-camera controller has a trigger input, I connect the same signal to that input or follow the controller’s specified wiring method. I protect the joint with a sealed connector and secure the wire away from moving parts.
I test the system in park before driving. Selecting reverse should switch the display to the rear camera, while the front camera should remain available through its assigned input. If the screen stays blank, I check the fuse, ground, video input, trigger voltage, and camera selection settings.
Testing, Calibration, And Ongoing Maintenance
I confirm that both cameras record clear video, point at the correct areas, and save files without errors. I also check the wiring, memory card, and power connection regularly so the system remains reliable.
Verifying Video Feeds And Recording
I turn on the vehicle and check the live view from both cameras. The front feed should show the road without blocking the driver’s view. The rear or cabin feed should show its intended area without excessive glare, reflections, or objects covering the lens.
I make a short test recording, then review it on the camera or a computer. I check video clarity, date and time stamps, audio settings, and whether both channels save correctly. I also confirm that the camera switches to parking mode or turns off as expected when the ignition stops.
If the system uses a separate monitor, I use it only to check image quality and camera position. I do not adjust settings while driving. I also verify that the camera does not reset or stop recording when the engine starts.
Adjusting Viewing Angles
I park on level ground and position the front camera so the horizon sits near the middle of the image. The camera should capture enough road and traffic while keeping the dashboard to a minimum. I avoid pointing it too high, since this can reduce useful road detail.
I aim the rear camera through the back window if it faces outward. I check for blocked areas caused by the rear defroster, headrests, tint, or a wiper. For an interior camera, I angle the lens to cover the cabin without pointing directly at bright sunlight.
After tightening the mount, I drive briefly and review the footage. I readjust the camera if the image vibrates, tilts, or leaves important blind areas. If the vehicle has a factory driver-assistance camera, I avoid disturbing its mount or field of view.
Inspecting Cables And Storage Media
I inspect the power cable along the windshield, trim, and power connection. I look for loose sections, sharp bends, exposed wire, and contact with pedals or moving parts. I secure excess cable without crushing it, and I cap any unused wires so they cannot touch metal.
I remove the memory card only when the camera is off. I check recorded files for gaps, corrupted clips, or repeated restart messages. If the camera supports it, I format the card through its menu after saving important footage.
I use a high-endurance microSD card that matches the camera’s required capacity and speed. I replace it when errors continue after formatting or when the manufacturer’s service interval ends. I also clean both lenses with a soft microfiber cloth and inspect the adhesive pad or bracket for movement.
Frequently asked questions
Will a dual camera system fit my car?
I first check the camera’s power requirements, cable length, mounting method, and connector type. Most systems fit standard vehicles, but some models may need extra adapters or longer cables.
Where should I mount the cameras?
I place the front camera near the top center of the windshield without blocking my view. I mount the rear camera high on the rear glass, keeping it clear of window tint lines, wipers, and defroster wires.
How do I hide the cables?
I route the cable along the headliner, down the door seal, and behind interior trim. I avoid sharp bends, moving parts, airbags, and areas where the cable could interfere with pedals or steering.
How should I power the system?
| Power method | Best use |
|---|---|
| 12-volt socket | Quick installation |
| Fuse tap | Hidden, permanent wiring |
| OBD adapter | Simple hidden connection |
I turn off the ignition before making electrical connections. For hardwiring, I use the correct fuse and check the vehicle manual first.
How do I test the installation?
I turn on the ignition and confirm that both cameras record clear views. I also check the date, time, audio settings, memory card, and rear-camera image before securing all trim panels.
What if the rear camera does not work?
I inspect both cable ends, confirm the connector is fully seated, and test the cable for damage. If the cable is too short, I use a manufacturer-approved extension rather than joining wires myself.
Conclusion
I install a dual-camera system by mounting the front camera near the center of the windshield and placing the rear camera where it has a clear view. I route the cables behind the headliner, door seals, and trim, taking care not to block airbags or interfere with controls.
I connect the cameras to a suitable power source, then secure any loose wiring. If I use parking mode, I install a compatible hardwire kit with the correct fuse and low-voltage protection. I follow the vehicle and camera manuals before changing trim or fuse connections.
Before driving, I check both camera angles, recording settings, date and time, and memory-card status. I test the system in daylight and at night, review front and rear footage, and confirm that the cables remain secure.
Regular checks help keep the system reliable. I clean both lenses, inspect the wiring, and format or replace the memory card according to the manufacturer’s instructions.